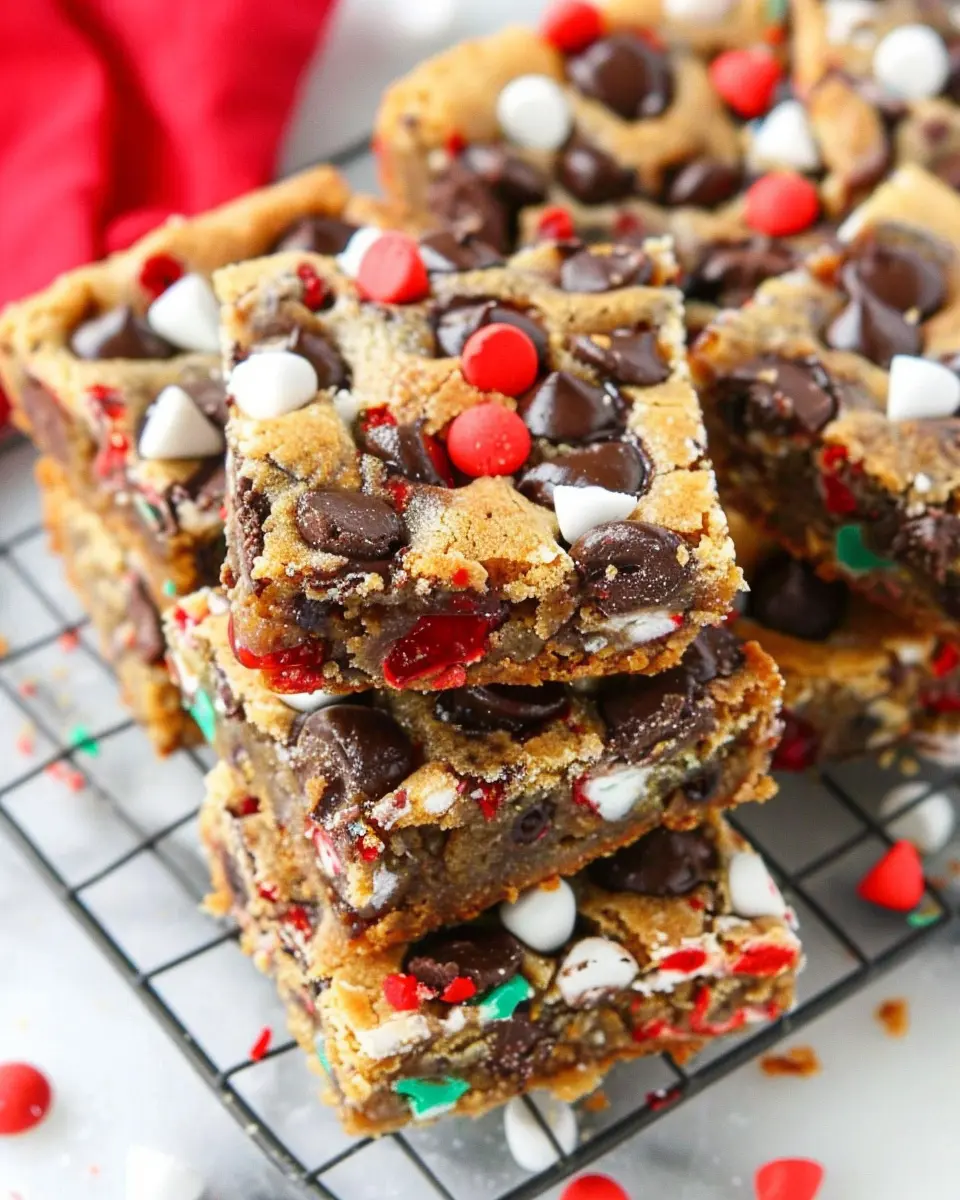
Introduction to Santa’s Cookie Bars
When it comes to holiday baking, few things evoke the warmth and joy of the season quite like homemade cookie bars. With their rich flavors and delightful textures, these sweet treats become a canvas for creativity, making them perfect for sharing with family, friends, and, of course, Santa himself. Imagine the look on his face as he bites into a warm slice of deliciously gooey cookie goodness!
The Magic of Homemade Cookie Bars
Santa’s Cookie Bars hold a special place in my heart. Growing up, my family would gather every December to whip up batches of cookie bars, each one packed with memories, laughter, and the enticing aroma of freshly baked goods wafting through the kitchen. These bars are not just a treat; they symbolize togetherness and the joy of giving.
So, what makes homemade cookie bars so magical? For starters, they are incredibly versatile. You can use your favorite cookie dough as a base and personalize your bars with an array of mix-ins, such as:
- Chocolate chips
- Nuts
- Dried fruit
- Sprinkles for a festive touch
This adaptability means that you can impress even the pickiest eaters while catering to diverse tastes. Plus, with a simple pan-based preparation, cookie bars eliminate the need for time-consuming individual cookies. Just slice and serve!
According to a study on the importance of food in fostering social connections, sharing homemade food can strengthen relationships—a great excuse to whip up a batch for your colleagues or neighbors (source: Psychology Today).
Aside from their wonderful taste and social benefits, the beauty of Santa’s Cookie Bars lies in their easy preparation. In less than an hour, you can create something truly special that embodies the spirit of the holidays. So dust off your mixing bowls, preheat that oven, and let the magic of baking unfold!
As you dive into our delicious recipe for Santa’s Cookie Bars, keep in mind that each ingredient contributes not just to flavor but also to the joy and warmth that makes the season truly special. Get ready to create your own holiday tradition!
Ingredients for Santa’s Cookie Bars
Creating delicious Santa’s Cookie Bars is all about the right ingredients! To make this festive treat, you’ll need the perfect blend of flavors that come together beautifully. Here’s what you’ll want to gather from your pantry:
Essential Ingredients
- 1 cup unsalted butter: This adds richness and a nice crumb to your bars.
- 2 cups brown sugar: For that lovely caramelized sweetness!
- 2 large eggs: These help bind everything and create a chewy texture.
- 2 teaspoons vanilla extract: This enhances the overall flavor—you can explore options like hazelnut or almond for a twist.
- 3 cups all-purpose flour: The base for your bars; it’s what holds everything together.
- 1 teaspoon baking soda: For a slight rise and lightness.
- 1/2 teaspoon salt: Just a pinch enhances the sweetness!
- 1 cup chocolate chips: Dark, milk, or a mix of both—get creative!
Optional add-ins can include nuts, dried fruits, or even sprinkles for that extra holiday cheer. For a health-conscious choice, consider using alternative sweeteners like coconut sugar.
Be prepared for a wonderful blend of flavors in your Santa’s Cookie Bars! Need more tips on perfecting these treats? Check out resources from The Kitchn for baking inspiration!
Step-by-step Preparation for Santa’s Cookie Bars
The holidays are the perfect time to indulge your sweet tooth, and what better way to celebrate than by making Santa’s Cookie Bars? These festive treats are ideal for sharing with friends and family or leaving out for Santa himself. Let’s dive straight into the step-by-step preparation to create these delicious bars that are sure to become a holiday tradition.
Prepare your baking pan and oven
Before we whip up the best Santa’s Cookie Bars ever, it’s key to get your tools ready. Start by preheating your oven to 350°F (175°C). Meanwhile, grab a 9×13-inch baking pan and line it with parchment paper, allowing some overhang on the sides. This little trick will make it super easy to lift the whole batch out once they’re baked. For extra insurance against sticking, consider giving the parchment a light grease with cooking spray.
Cream the butter and sugars
In a large mixing bowl, it’s time to bring out the good stuff—your butter and sugars. Start with 1 cup of softened unsalted butter, and add in both brown and granulated sugar (½ cup each). Use an electric mixer or a good old-fashioned whisk to cream these ingredients until they are light and fluffy. The idea is to incorporate air, giving your bars that fantastic texture. Did you know that creaming butter and sugar is a crucial step in baking? It helps create a light and airy structure in your baked goods.
Incorporate eggs and vanilla
Next, let’s add that holiday cheer with eggs and vanilla extract! Beat in 2 large eggs, one at a time, ensuring they are well incorporated before adding the next. You’ll also want to mix in 2 teaspoons of pure vanilla extract. This not only enhances flavor but fills your kitchen with that wonderfully festive aroma. As you mix, remember—it’s about creating a batter that feels cohesive and smooth.
Mix in the dry ingredients
Now it’s time to blend the wet ingredients with your dry ones. In a separate bowl, whisk together 2 cups of all-purpose flour, 1 teaspoon of baking soda, and ¼ teaspoon of salt. Gradually fold this mixture into your wet ingredients, being careful not to overmix; a few flour streaks are perfectly fine. This is where your Santa’s Cookie Bars start to come together, so you can almost taste the sweetness!
Fold in the fun stuff
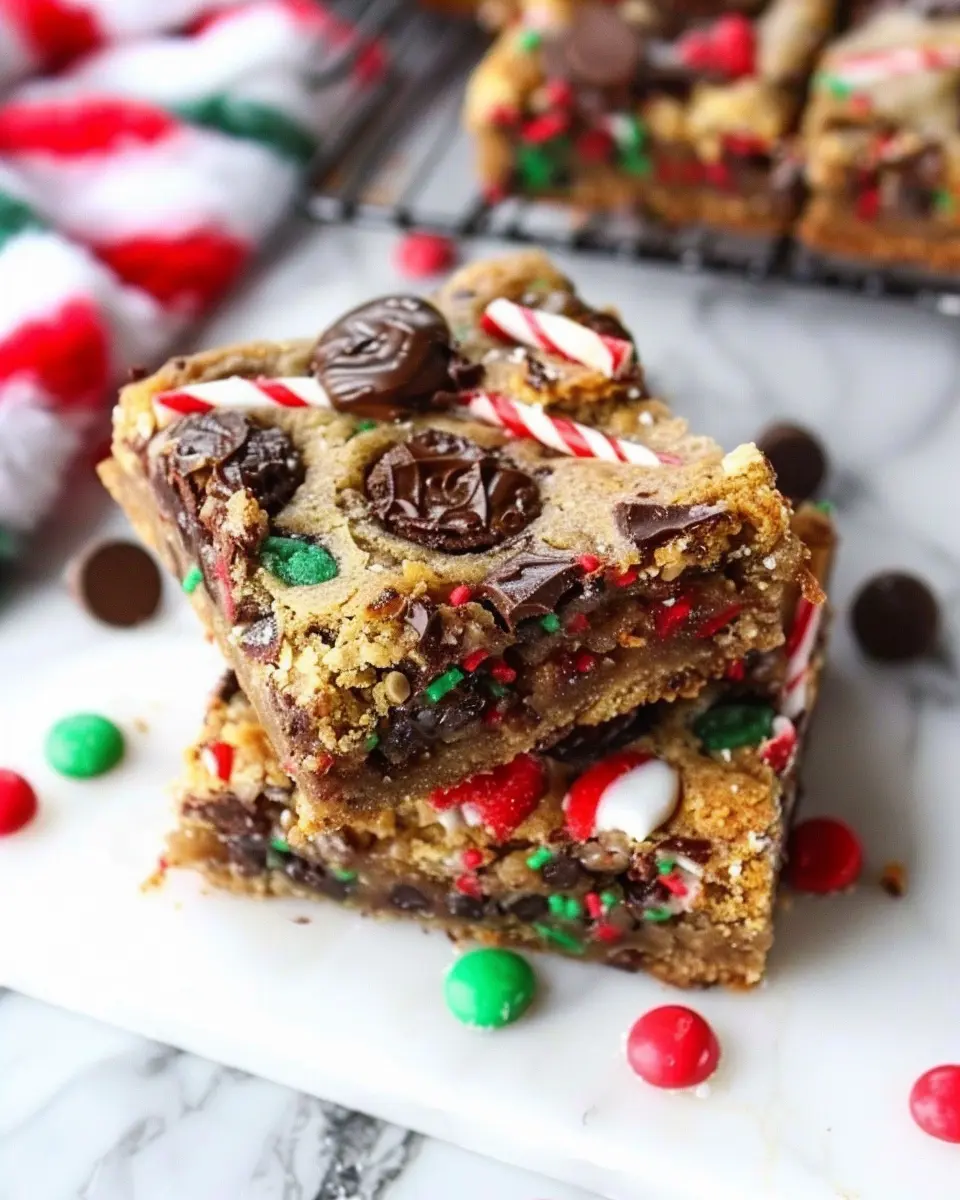
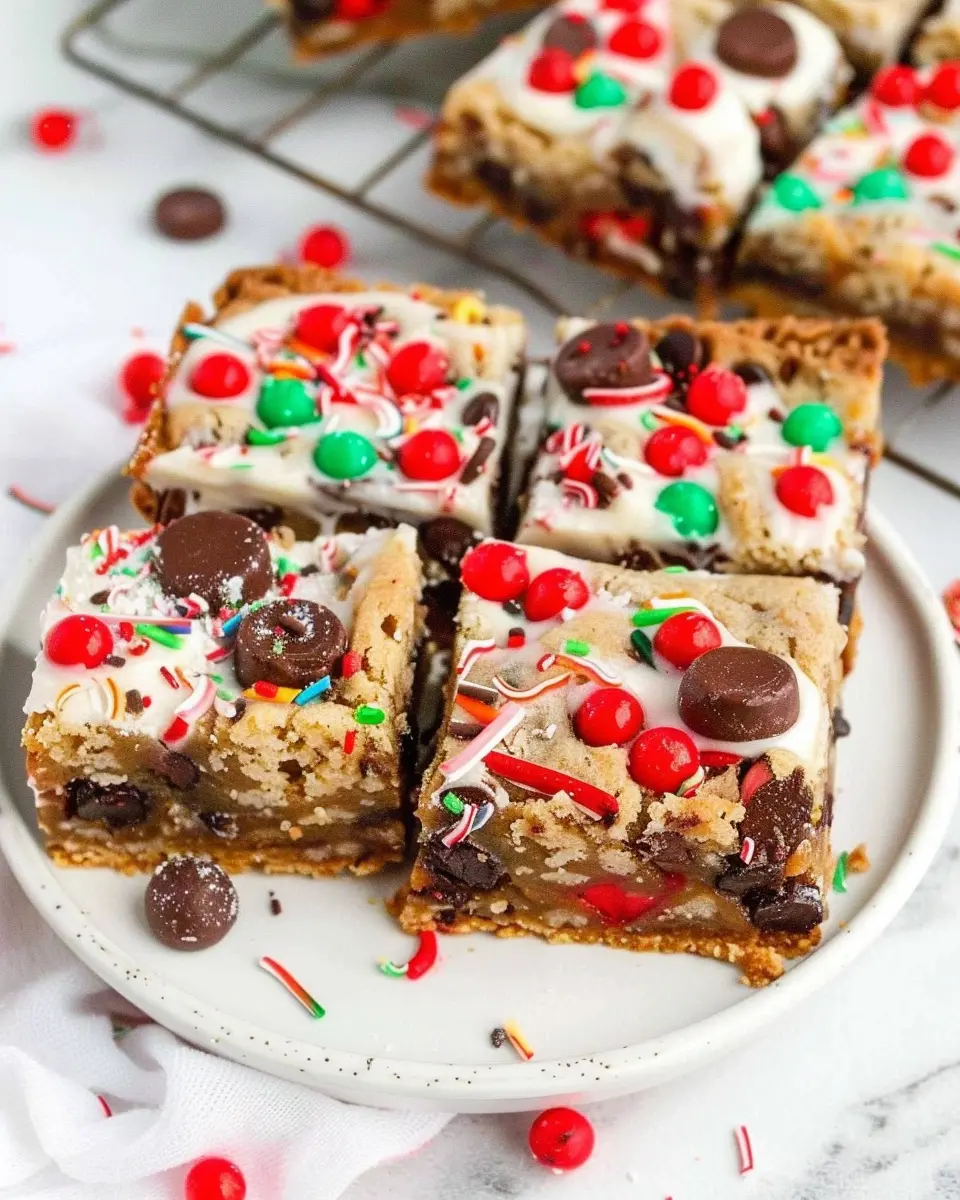
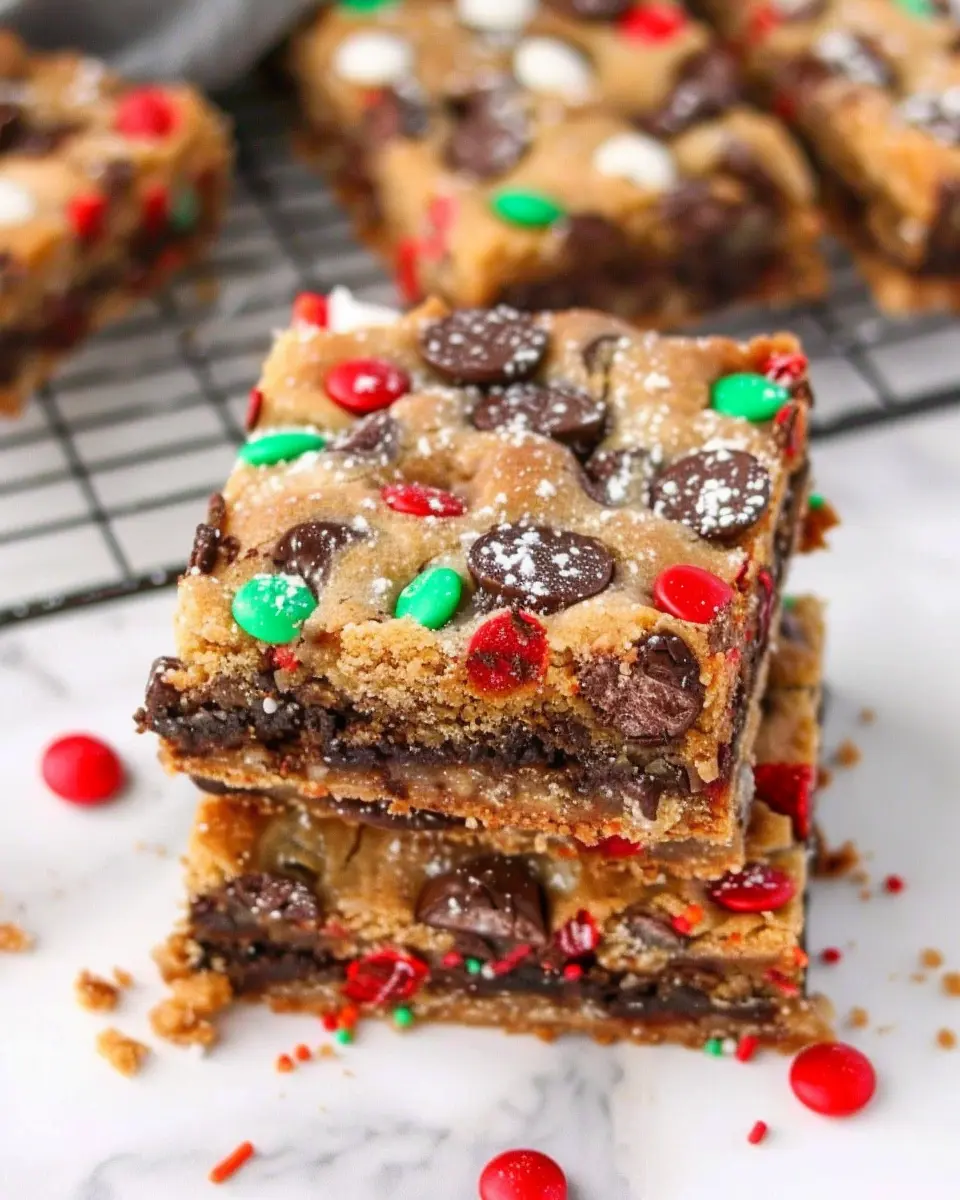
Let’s make sure these bars are packed with joy! Fold in 1 cup of chocolate chips (milk or dark, your choice) and 1 cup of colorful holiday sprinkles. The sprinkles add a festive touch, while the chocolate chips bring in that rich flavor we all adore. Feel free to swap in other fun additions like chopped nuts or dried fruit if that tickles your fancy.
Layer the Oreos
Now, here’s the secret to making these bars extra special: Oreos! Take 10-12 Oreos and lay them flat against the bottom of your prepared baking pan. They’ll create a delicious cookie layer and give your Santa’s Cookie Bars a surprise twist.
Spread and sprinkle the remaining dough
Scoop out about half of your batter and spread it over the layer of Oreos, ensuring it’s evenly distributed. Crumble the remaining dough on top to create a delightful topping. Don’t worry about making it look perfect; it just needs to taste good!
Bake to perfection
Finally, it’s time to pop that pan into the oven. Bake for about 25-30 minutes or until the edges turn golden brown and the center is set. Keep an eye on your bars, as every oven is a little different. When they’re done, allow them to cool in the pan for about 15 minutes, then lift them out using the parchment overhang. Cut into squares, and voilà! You’ve just made magical Santa’s Cookie Bars!
Take a moment to savor your creation—you deserve it! Want to elevate your bar game? Check out this baking guide for more tips and tricks to impress during the holiday season. Enjoy your baking adventure!
Variations on Santa’s Cookie Bars
Peppermint Twist for the Holidays
Want to sprinkle a little extra magic into your Santa’s Cookie Bars? Consider adding a peppermint twist! Just crumble some peppermint candies or use crushed candy canes and fold them into the batter. This not only enhances the festive flavor but also adds a lovely crunch. For an even more vibrant touch, drizzle melted white chocolate over the top and sprinkle more crushed peppermint on it before serving. If you’re feeling particularly cozy, enjoy these bars with a warm mug of hot cocoa or spiced tea—perfect for sharing while watching your favorite holiday movie.
Nutty Additions to the Mix
If you’re a fan of Santa’s Cookie Bars, you might also appreciate incorporating some nutty goodness into your recipe. Chopped walnuts or pecans can add a delightful texture and depth of flavor. Personally, I love the combination of chocolate chips with hazelnuts; it’s like a personal touch that takes the bars to the next level. Not only do nuts provide added nutrients, but they also create those little surprises in each bite. If you’re looking to accommodate nut allergies, consider using sunflower seeds or pumpkin seeds as fun alternatives.
Whether you stick with the classic version or try these variations, Santa’s Cookie Bars are sure to charm everyone around the holiday table. For more festive recipe ideas, check out resources like Food Network or Bon Appétit to inspire your holiday baking!
Cooking Tips and Notes for Santa’s Cookie Bars
When it comes to making Santa’s Cookie Bars, a few essential tips can elevate your baking game. Whether you’re a novice baker or a seasoned pro, these insights will help you create the perfect batch every time.
Choose Quality Ingredients
The base of any fantastic cookie bar lies in quality ingredients. Use real butter for that rich flavor and don’t skimp on the chocolate! Opt for high-quality chocolate chips or chunks for a delightful melt-in-your-mouth experience. Check out resources like Serious Eats for more on ingredient selection.
Baking Time Matters
Baking is both an art and a science. For Santa’s Cookie Bars, keep an eye on your oven and check for doneness a few minutes before the suggested baking time. They should look slightly underbaked in the center – they will continue to set as they cool.
Let Them Rest
Resist the temptation to cut into your cookie bars right away. Allow them to cool completely in the pan before slicing. This step is crucial for easier serving and helps the flavors meld beautifully.
With these tips, you’re well on your way to crafting delightful Santa’s Cookie Bars. Happy baking!
Serving Suggestions for Santa’s Cookie Bars
When it comes to enjoying Santa’s Cookie Bars, the presentation can elevate your holiday experience. Whether you’re hosting a festive gathering or simply treating yourself, here are some delightful serving ideas to consider.
Pair with Festive Drinks
Consider serving Santa’s Cookie Bars alongside a warm mug of hot chocolate or a spiced apple cider. The sweetness of the bars complements the cozy flavors of these beverages perfectly. Try making your hot chocolate gourmet by adding marshmallows or peppermint sticks for extra flair!
Create a Dessert Platter
Elevate your dessert game by arranging Santa’s Cookie Bars on a beautifully styled platter. Add a variety of other holiday treats like gingerbread cookies or chocolate-covered pretzels. This colorful spread will tantalize your guests and spark conversations about their favorite holiday goodies!
Sharing is Caring
Why not share the joy? Gift Santa’s Cookie Bars in decorative boxes to friends and colleagues. Not only will this spread cheer, but it’s a thoughtful gesture during the season of giving.
For more creative ideas, check out Food Network’s holiday party tips for inspiration on making your gatherings more memorable. Happy baking!
Time Breakdown for Santa’s Cookie Bars
When the holiday season hits, nothing delights quite like Santa’s Cookie Bars. To ensure you make these treats perfectly, here’s a handy time breakdown.
Preparation Time
Getting everything ready for Santa’s Cookie Bars takes about 15 minutes. It’s a swift process where you mix up the ingredients, line your pan, and get ready to bake.
Baking Time
Once prepped, pop those bars in the oven for 25-30 minutes. You’ll want to keep an eye on them during the last few minutes to achieve that golden brown perfection.
Total Time
In just 40-45 minutes, you can have delicious Santa’s Cookie Bars cooling on your countertop. This makes them perfect for last-minute gatherings or cozy nights in!
Want a perfect pairing? Try these hot cocoa recipes to elevate your cookie bar experience. What’s your favorite holiday treat to bake? Share in the comments!
Nutritional Facts for Santa’s Cookie Bars
When indulging in Santa’s Cookie Bars, it’s always wise to consider what you’re treating yourself to. These delightful treats not only satisfy your sweet tooth but also come with some nutritional insights that may surprise you.
Calories
A standard serving of Santa’s Cookie Bars contains approximately 200 calories, making it a perfect sweet spot for an afternoon pick-me-up without overindulging.
Protein
Each bar offers 5 grams of protein. This is a nice little bonus, especially when you’re enjoying them after a workout or as part of a balanced diet.
Sodium
When it comes to sodium, Santa’s Cookie Bars have about 120 milligrams per serving. While that’s reasonable, be mindful of your overall sodium intake throughout the day.
If you want to make these bars even healthier, consider using whole grain flour or swapping in some natural sweeteners. Curious to learn more about nutrition tips when baking? Check out this (Healthy Baking Guide)[https://www.healthline.com/nutrition/healthy-baking-guide] for extra insights!
FAQ about Santa’s Cookie Bars
Can I use regular Oreos instead of Christmas Oreos?
Absolutely! While Christmas Oreos bring a festive touch with their red and green filling, regular Oreos work just as well in Santa’s Cookie Bars. The rich chocolate flavor will still shine through, making your bars a delightful treat for everyone. Feel free to adapt the recipe based on your pantry staples or seasonal cravings.
What if I don’t have mini chocolate chips?
No mini chocolate chips? No problem! You can easily substitute them with regular-sized chocolate chips or even chop up a chocolate bar into small pieces. Alternatively, try using white chocolate chips or peanut butter chips for a fun twist. The beauty of Santa’s Cookie Bars is that they’re versatile, and creativity in the kitchen usually leads to mouthwatering results.
How should I store leftover cookie bars?
Storing your delicious Santa’s Cookie Bars is simple! Place them in an airtight container at room temperature for up to 3 days. If you want them to last longer, refrigerating them can extend their life to about a week. For longer storage, you can freeze them! Just wrap individual bars in plastic wrap and then place them in a freezer bag. Thaw them at room temperature when you’re ready to indulge again!
Whether you’re making these for a holiday gathering or just a cozy night in, these cookie bars are sure to be a hit! Want to learn more tips and tricks? Check out this baking guide for more insights.
Conclusion on Santa’s Cookie Bars
In wrapping up our delightful journey with Santa’s Cookie Bars, it’s clear that these treats are more than just a holiday sweet; they’re a heartfelt gift for Santa and a perfect indulgence for your family. With the combination of rich flavors and gooey textures, these bars are sure to become a seasonal favorite that you’ll make year after year. Plus, they’re incredibly easy to whip up, making them ideal for busy young professionals.
When you’re in the kitchen, remember, baking is about the joy of creating and sharing. Consider trying out variations such as adding nuts or swapping out chocolate chips for dried fruits. For more baking tips and variations, check out resources like King Arthur Baking or Food Network.
Happy baking, and may your Santa’s Cookie Bars bring joy to everyone they touch!
PrintSanta’s Cookie Bars: The Best Indulgent Treat for Your Holiday Table
Indulge in the sweet taste of the holidays with Santa’s Cookie Bars, the perfect treat to bring joy to your holiday table.
- Prep Time: 15 minutes
- Cook Time: 30 minutes
- Total Time: 45 minutes
- Yield: 24 servings 1x
- Category: Dessert
- Method: bake
- Cuisine: American
- Diet: vegetarian
Ingredients
- 2 cups all-purpose flour
- 1 cup brown sugar
- 1/2 cup granulated sugar
- 1 cup unsalted butter, softened
- 2 large eggs
- 1 teaspoon vanilla extract
- 1/2 teaspoon baking soda
- 1/4 teaspoon salt
- 2 cups chocolate chips
Instructions
- Preheat your oven to 350°F (175°C).
- In a large bowl, cream together the softened butter, brown sugar, and granulated sugar.
- Add in the eggs and vanilla extract, mixing well.
- In another bowl, whisk together flour, baking soda, and salt.
- Gradually add the dry ingredients to the wet mixture.
- Fold in the chocolate chips.
- Spread the batter into a greased 9×13 inch baking pan.
- Bake for 25-30 minutes or until golden brown.
- Let cool before cutting into bars.
Notes
- For extra flavor, consider adding nuts or dried fruit.
- Make sure to let the bars cool completely for easier cutting.
Nutrition
- Serving Size: 1 bar
- Calories: 250
- Sugar: 20g
- Sodium: 150mg
- Fat: 15g
- Saturated Fat: 9g
- Unsaturated Fat: 5g
- Trans Fat: 0g
- Carbohydrates: 30g
- Fiber: 1g
- Protein: 3g
- Cholesterol: 45mg
Keywords: Santa's Cookie Bars, holiday treats, dessert recipes