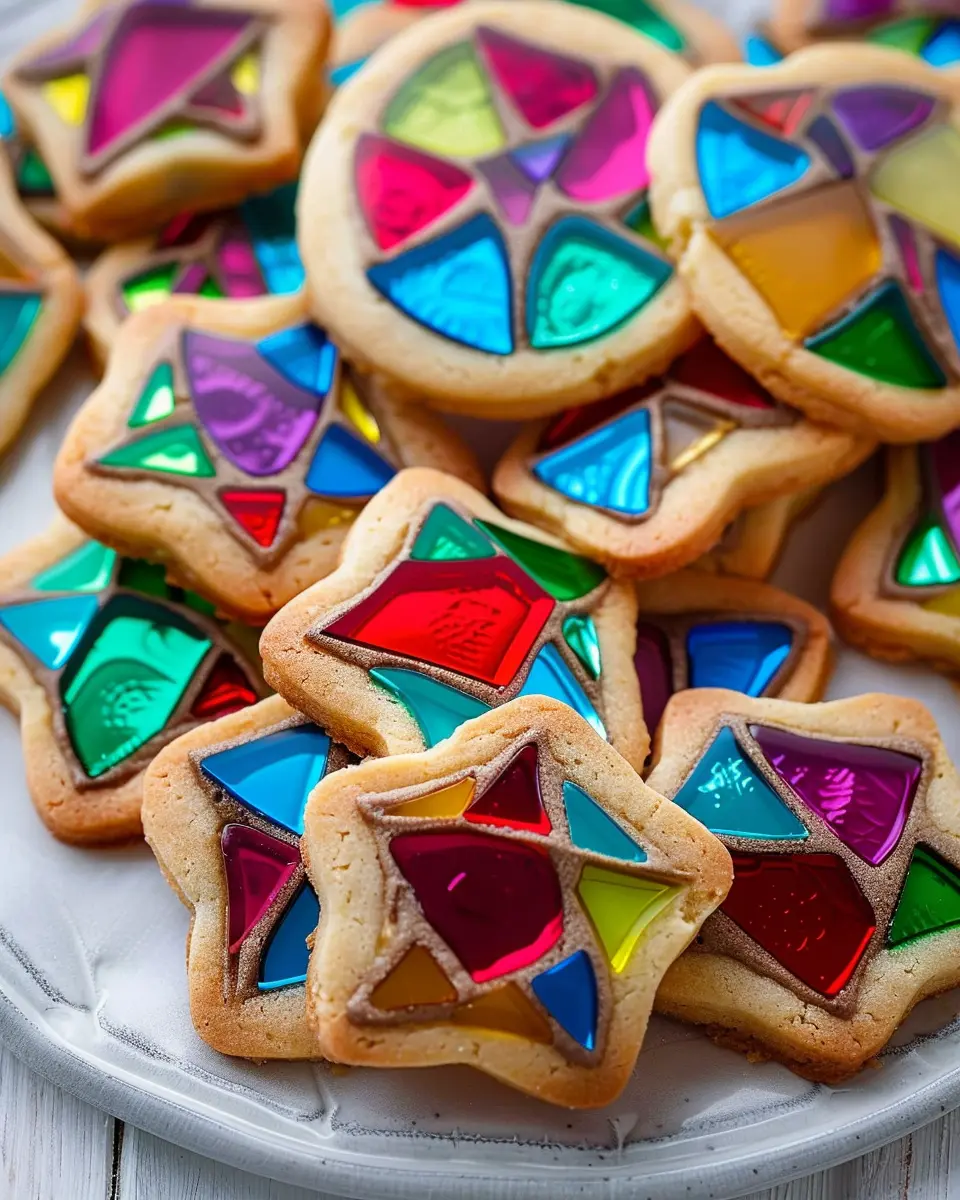
Introduction to Stained Glass Cookies
The Irresistible Allure of Stained Glass Cookies
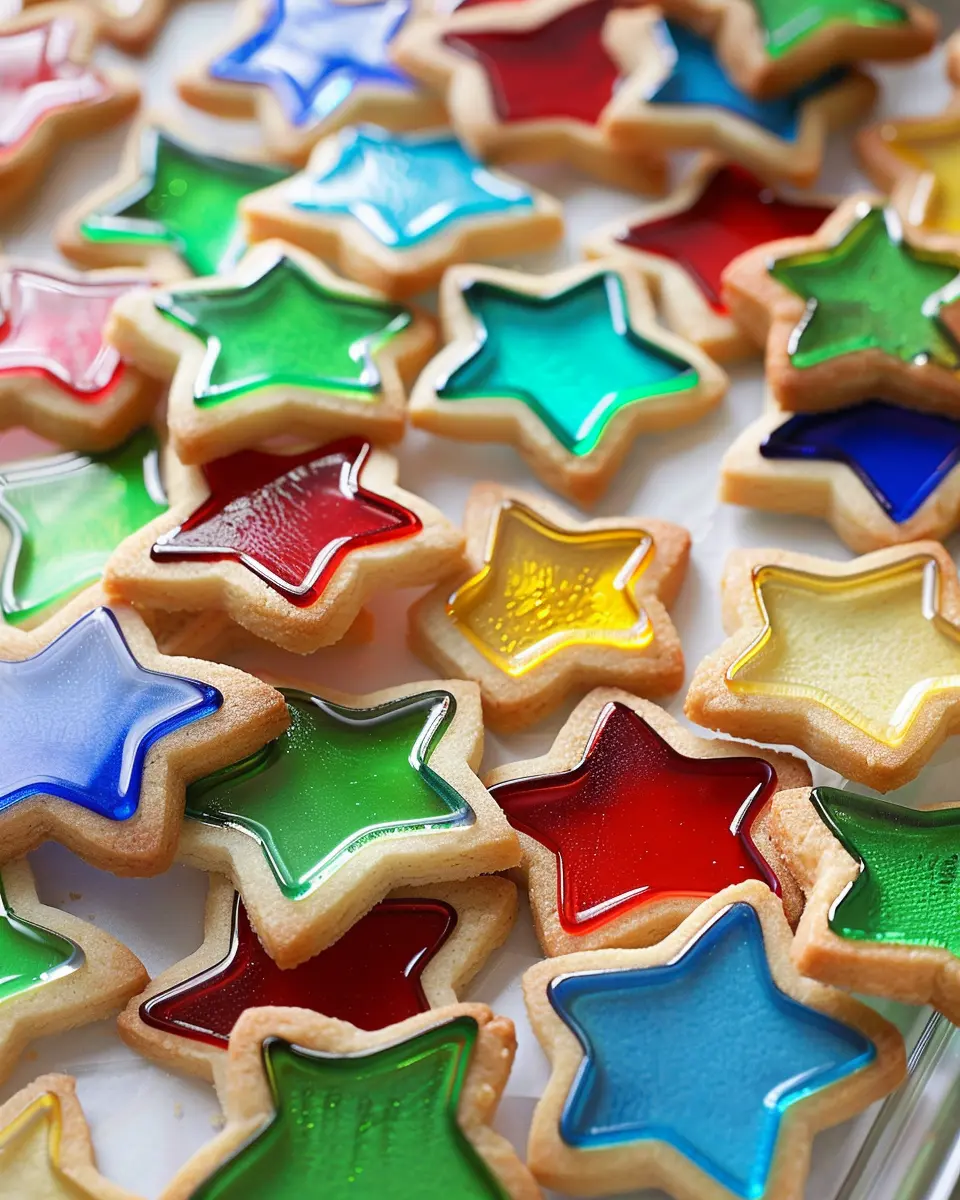
If you’re looking for a treat that not only tantalizes your taste buds but also captivates your eyes, then stained glass cookies are the perfect choice for your next baking adventure. These delightful cookies are more than just a sweet snack; they are a canvas for creativity and a conversation starter at any gathering. Imagine a bright, colorful cookie that resembles a stained glass window—how can you resist?
Baking stained glass cookies might sound intricate, but I assure you, it’s simpler than it looks. These cookies typically feature a buttery base that crumbles beautifully, paired with vibrant jelly or hard candies that melt into dazzling shapes. The end result? A cookie that’s both crunchy and chewy, with a pop of sweetness from the sugary center. It’s an exciting way to impress your friends and family, especially during the holiday season or at children’s birthday parties.
You might be wondering, “What flavors can I experiment with?” That’s the beauty of stained glass cookies! From classic vanilla to zesty lemon or rich cocoa, the dough can be tailored to your preferences. For an added twist, consider using various types of candy for the filling—think sour belts or fruit-flavored gummies for a playful touch. This versatility makes them an excellent fit for any occasion.
But before you dive in, you should know there are a few tips and tricks to ensure your stained glass cookies turn out perfectly. First, ensure your cookie dough is chilled; this helps maintain their shape during baking. Second, choose high-quality candies, as they truly enhance the overall flavor and appearance. Finally, patience is key—let the cookies cool completely before handling, or you might end up with a sugary mess!
Ready to embark on this sweet journey? Check out this detailed guide on cookie baking tips for more inspiration, and let’s get started on creating your own batch of stained glass magic!
Ingredients for Stained Glass Cookies
When it comes to baking stained glass cookies, having the right ingredients is crucial for achieving those stunning, colorful treats that wow everyone. Here’s a friendly guide to get you started!
Essential components for vibrant cookies
To create these delightful cookies, gather the following ingredients:
- All-purpose flour: The base for your cookie dough, providing structure.
- Granulated sugar: Sweetens up your cookies—don’t skip this!
- Butter: Use unsalted for better control over your cookie’s flavor.
- Eggs: Two large eggs lend moisture and richness.
- Vanilla extract: Adds a lovely flavor that complements the sweetened dough.
- Baking powder: This is your leavening agent, helping the cookies rise.
- Interchangeable candies: Use colorful hard candies like Jolly Ranchers or Life Savers to create the stained glass effect. These will melt beautifully to give that signature look.
To explore more fun cookie ideas and baking tips, check out resources like King Arthur Baking or Food Network. With these ingredients, you’re on your way to making delicious stained glass cookies that will impress friends and family alike!
Preparing Stained Glass Cookies
Ah, the joy of baking — especially when it involves creating colorful and delightful stained glass cookies! Not only are they a treat for the taste buds, but they’re also a feast for the eyes. So, if you’re ready to get your hands a bit doughy and embark on this tasty adventure, let’s dive into the step-by-step process.
Gather and Prep Your Ingredients
The foundation of any successful baking session starts with gathering all your ingredients. For stained glass cookies, you will need:
- 2 cups all-purpose flour
- 1 cup unsalted butter, softened
- 1 cup granulated sugar
- 1 large egg
- 1 teaspoon vanilla extract
- 1/2 teaspoon salt
- Jolly Ranchers (for that stunning stained glass effect!)
It’s highly recommended to crush the Jolly Ranchers into small pieces beforehand, as this will make the process smoother when filling the cookies. This eforall.com guide on ingredient preparation can be useful if you’re new to baking!
Cream the Butter and Sugar
Now that everything is ready, it’s time for the fun part! In a large mixing bowl, use a hand mixer or stand mixer to cream together the butter and sugar until the mixture is light and fluffy. This usually takes about 2-3 minutes. Not only does this step help incorporate air into your dough, but it also delights the senses with its buttery aroma.
Incorporate Eggs and Vanilla
Once you’ve achieved that fluffy consistency, it’s time to add the egg and vanilla extract. Mix well until everything is fully combined. The egg will add moisture and richness to your cookies, while the vanilla enhances their aroma and flavor. Fun tip: choose high-quality vanilla extract for the best results.
Mix in the Flour
Next, gradually add in the all-purpose flour and salt. You want to mix until just combined—overmixing can lead to tough cookies! When the dough starts to pull away from the sides of the bowl, you know you’re on the right track. It should feel soft but not sticky.
Chill the Cookie Dough
Now, here’s an essential step that can significantly improve the texture of your stained glass cookies. Wrap the dough in plastic wrap and refrigerate it for at least an hour. This not only helps firm up the dough (making it easier to roll out) but also allows the flavors to meld beautifully. If you’re wondering, chilling is similar to letting a fine cheese rest after it’s been made—everything just gets better with a breather!
Roll Out and Cut the Dough
After chilling, it’s time to roll out your cookie dough on a lightly floured surface. Aim for about 1/4 inch thickness. Use cookie cutters to create various shapes. Don’t forget to create a smaller shape in the center to hold the crushed Jolly Ranchers—this is where the magic happens!
Fill with Crushed Jolly Ranchers
Now comes one of the most exciting parts. Place the cookie shapes on a parchment-lined baking sheet and fill the center of each cutout with the crushed Jolly Ranchers. Make sure not to overfill, or the candy may spill out during baking.
Bake to Perfection
Preheat your oven to 375°F (190°C) and bake the cookies for about 8-10 minutes or until the edges are golden. Keep an eye on them; you want those Jolly Ranchers to melt beautifully without burning. Once they’re out of the oven, let them cool on the baking sheet for a few minutes before transferring them to a wire rack to finish cooling.
There you go! With each step designed to ensure your stained glass cookies come out delicious and beautiful, you’ll have a delightful treat that’s as lovely as it is tasty. Happy baking!
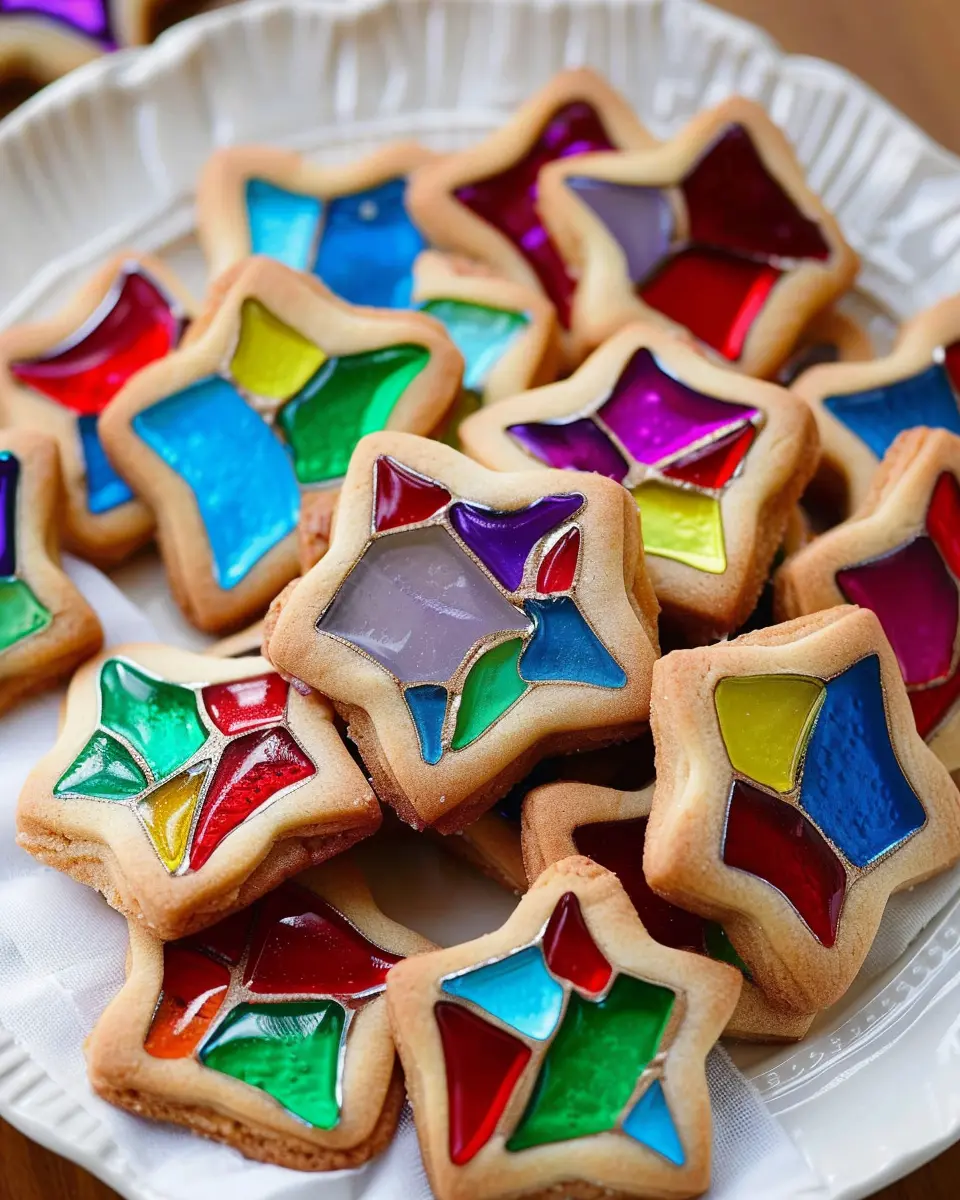
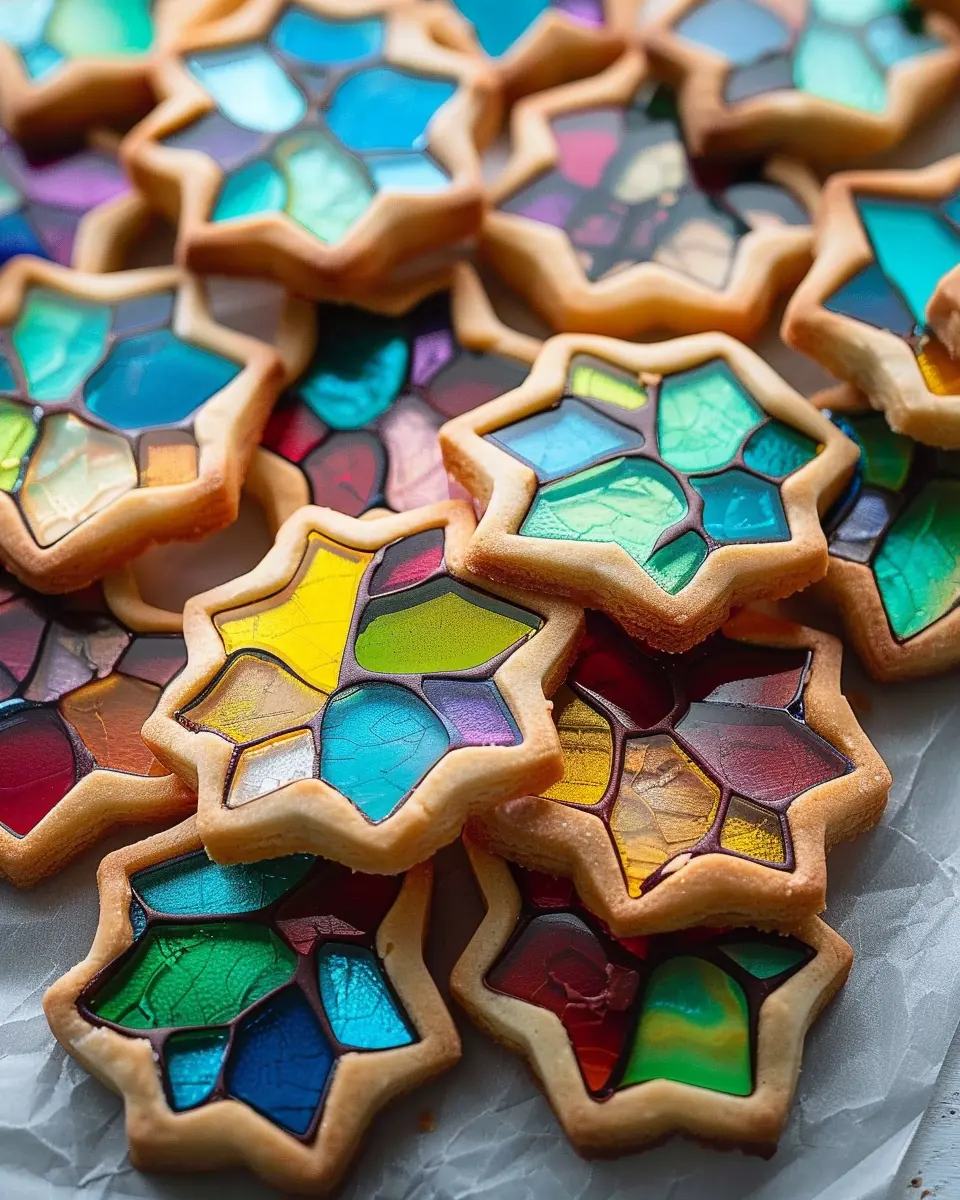
Variations on Stained Glass Cookies
Colorful Holiday-Themed Cookies
When it comes to stained glass cookies, think beyond the classic shapes and colors. The holiday season is the perfect time to get creative! Imagine vibrant Christmas trees adorned with green and red candies or Easter eggs filled with pastel hues. You can easily customize the colors of your crushed candies to suit any occasion, making these cookies a versatile treat for any celebration.
- Winter Wonderland: Use white and blue candies for a frosty look, perfect for winter gatherings.
- Spooky Surprise: Orange and black candies could transform your cookies into a Halloween delight.
Check out The Cookie Box for more festive ideas on cookie decorating.
Unique Flavor Additions for a Twist
Why stick to the traditional vanilla flavor when you can elevate your stained glass cookies with some exciting twists?
- Lemon Zest: Incorporating lemon zest into your dough adds a refreshing tang that perfectly complements the sweetness of the candies.
- Almond Extract: This subtle nutty flavor can enhance the overall taste profile, creating a delightful background note.
- Spices Galore: Don’t hesitate to throw in a pinch of cinnamon or nutmeg for that warming spiciness we often crave during the colder months.
Feeling adventurous? Try blending different flavors for a unique cookie experience. For instance, lemon and almond create a sophisticated cookie that balances sweet and tart flawlessly.
By experimenting with these variations, you’ll impress your friends and family with not just the visual appeal of your stained glass cookies, but also with layers of flavor that make each bite a delightful surprise!
Baking Notes for Stained Glass Cookies
When it comes to baking stained glass cookies, achieving the perfect texture can make all the difference. Here are some friendly tips to ensure your cookies turn out beautifully.
Tips for Achieving the Perfect Cookie Texture
-
Chill Your Dough: After mixing your cookie dough, give it a good hour in the refrigerator. This not only makes it easier to roll out but also helps prevent spreading during baking.
-
Use Fresh Ingredients: Outdated baking powder or flour can result in tough cookies. Fresh ingredients ensure a lighter, fluffier texture. You can check the freshness of baking powder by adding a bit to hot water; if it bubbles, it’s good to go!
-
Watch the Oven Temperature: Baking at the right temperature is essential. Too hot, and your cookies will brown too quickly; too cool, and they won’t set properly. Investing in an oven thermometer can be a game-changer.
Each of these tips can help elevate your cookie game to impress your friends and family. For more detailed ideas, consider visiting resources like the Joy of Baking for more cookie baking techniques. Happy baking!
Serving suggestions for Stained Glass Cookies
Creative ways to display and share your cookies
Stained glass cookies are not just a treat for the taste buds; they’re also a visual delight! When it comes to serving these colorful confections, creativity is key. Here are a few friendly and visually appealing ideas to consider:
-
Decorative platters: Arrange your cookies on a bright, festive platter that contrasts beautifully with the colors of the cookies. A white or pastel dish allows the vibrant hues to pop, enticing guests and sparking conversation.
-
Gift boxes: Package your stained glass cookies in clear treat bags or small boxes tied with a ribbon. They’re perfect edible gifts for birthdays or holidays. You could even customize them by adding a little note with your favorite cookie quote or a personal message!
-
Themed displays: Use seasonal decorations to bring your cookies to life. During holidays, you can place them alongside themed centerpieces, or even create a cookie tree for a fun twist at special gatherings.
For more tips on cookie presentation, you can explore The Spruce Eats for additional inspiration. Enjoy sharing your colorful creations—they’re sure to make everyone’s day a little brighter!
Tips for Making Perfect Stained Glass Cookies
Baking stained glass cookies is a delightful way to add some color to your holiday festivities. But we all know that even the best bakers can face some hiccups along the way. Here are a few tips to ensure your cookies turn out beautifully every time.
Common Pitfalls to Avoid
-
Overmixing the Dough: While you might think that mixing until smooth is best, overmixing can lead to tough cookies. Mix until just combined for that soft, tender texture.
-
Choosing the Right Candies: Not all hard candies are created equal. Opt for clear varieties like Jolly Ranchers or Lifesavers to get the best stained glass effect. Avoid darker candies as they can muddle the appearance.
-
Chilling the Dough: Don’t skip this crucial step! Chilling the dough helps maintain the cookie shape while baking, preventing them from spreading too much.
-
Baking Time: Keep an eye on your cookies. They should be set but not overly browned. Every oven is different, so start checking a couple of minutes before the suggested time.
-
Cooling Properly: Allow your stained glass cookies to cool on the baking sheet for a few minutes before transferring them to a wire rack. This will prevent any breakage and help maintain the gorgeous candy centers.
Stay tuned for more cookie secrets and tips on how to elevate your baking game! For more on cookie techniques, check out resources from Bon Appétit.
Time details for Stained Glass Cookies
Preparation time
Making stained glass cookies takes about 30 minutes. During this time, you’ll mix the dough and roll it out, allowing your creativity to shine as you cut out festive shapes. It’s the perfect opportunity to turn on some music and enjoy the process. Keep a few cookie cutters handy for variety—they’re your tools for creating beautiful, edible art!
Baking time
Once your cookies are ready, pop them in the oven for about 8 to 10 minutes. You’ll love the smell of buttery cookies wafting through your kitchen, with hints of sweetness from the sugar.
Total time
In total, you’re looking at about 40 minutes from start to finish. Just think, in under an hour, you’ll have a delightful batch of stained glass cookies that not only look amazing but taste phenomenal, too! Don’t forget to let them cool before the grand reveal of their colorful centers.
For more details on baking times for various cookie types, check out this insightful article from the Food Network.
Nutritional information for Stained Glass Cookies
When crafting delicious stained glass cookies, it’s good to have a grasp on their nutritional profile, especially if you’re sharing them at a gathering or keeping track of your intake. Here’s a breakdown of some key nutritional information you’ll find in a serving of these festive treats.
Calories
These colorful cookies typically contain around 100-120 calories each. While they’re delightful, moderation is key!
Protein
In terms of protein, stained glass cookies offer about 1-2 grams per cookie. They might not be a protein powerhouse, but they bring joy and sweetness to the table!
Sugar Content
On the sweeter side, each cookie usually contains around 8-10 grams of sugar. Given their vibrant appeal, it’s no surprise these decadent cookies have a bit of a sugar kick!
For a deeper dive into cookie nutritional details, the USDA National Nutrient Database is a fantastic resource to check out. Sharing these treats? Consider balancing them with healthier options and beverages, perhaps a refreshing herbal iced tea or a zesty lemonade!
FAQs about Stained Glass Cookies
What candies work best for the stained glass effect?
When it comes to creating the stunning stained glass effect in your cookies, the right candies can make all the difference. Jolly Ranchers are a popular choice due to their vibrant colors and ability to melt beautifully. You can also try Lifesavers, which pre-shape their holes nicely, adding an extra touch of charm. If you want to get creative, Werther’s Original or any hard candy that can be crushed will work well. Just ensure they are a variety of colors to really make your cookies pop!
How should I store leftover cookies?
After your stained glass cookies have cooled and dazzled guests, you’ll want to store any leftovers properly. The best approach is to keep them in an airtight container at room temperature. This helps maintain their delightful texture and keeps the colorful centers from becoming sticky. Layer your cookies with parchment paper if you’re stacking them to avoid unintentional breakage.
Can I freeze stained glass cookies?
Absolutely! Freezing stained glass cookies is a great way to enjoy them later while preserving their flavor and texture. To do this, make sure they’re completely cool, then place them in a single layer in a freezer-safe bag or container. For added protection, wrap them in plastic wrap first. They can last up to three months in the freezer. When you’re ready to indulge again, let them thaw at room temperature for a delightful treat that tastes freshly baked!
If you’re curious about the science behind baking or ways to enhance texture next time, check out this resource for expert tips!
Conclusion on Stained Glass Cookies
The joy of homemade treats
Creating stained glass cookies isn’t just about the sweetness; it’s an experience that brings joy and creativity to your kitchen. The vibrant colors melting into beautiful patterns make them a visual delight for family gatherings or holiday celebrations. Plus, they’re incredibly rewarding to share with friends—imagine their smiles as they bite into your delicious handiwork!
Making these cookies is not just simple; it’s a chance to experiment and bond, whether you’re baking solo or inviting friends over. So, gather your ingredients and have fun! Check out resources like Epicurious for even more baking inspiration, and enjoy the satisfaction of homemade goodness.
PrintStained Glass Cookies: Easy Recipe for Stunning Sweet Treats

Delightful stained glass cookies that are perfect for any occasion.
- Prep Time: 30 minutes
- Cook Time: 10 minutes
- Total Time: 40 minutes
- Yield: 24 cookies 1x
- Category: Dessert
- Method: Baking
- Cuisine: American
Ingredients
- 2 1/4 cups all-purpose flour
- 1 teaspoon baking powder
- 1/2 teaspoon salt
- 1 cup unsalted butter, softened
- 1 cup granulated sugar
- 1 large egg
- 1 teaspoon vanilla extract
- 1 cup crushed hard candy (e.g. Jolly Ranchers)
Instructions
- Preheat oven to 350°F (175°C).
- In a bowl, whisk together flour, baking powder, and salt.
- In another bowl, cream the butter and sugar until light and fluffy.
- Add egg and vanilla; mix until combined.
- Gradually add dry ingredients to wet ingredients, mixing until just incorporated.
- Chill dough for at least 30 minutes.
- Roll out the dough to 1/4-inch thickness and cut into desired shapes.
- Cut out the center of each cookie and fill with crushed hard candy.
- Bake for 8-10 minutes until edges are lightly colored.
- Let cool before serving.
Notes
- For vibrant colors, use different colored hard candies.
- Cut out shapes in various sizes for a fun design.
Nutrition
- Serving Size: 1 cookie
- Calories: 120
- Sugar: 10g
- Sodium: 50mg
- Fat: 7g
- Saturated Fat: 4g
- Unsaturated Fat: 2g
- Trans Fat: 0g
- Carbohydrates: 15g
- Fiber: 0g
- Protein: 1g
- Cholesterol: 30mg
Keywords: Stained Glass Cookies, cookies, holiday treats, easy recipes